
EECP® Therapy Patient Setup
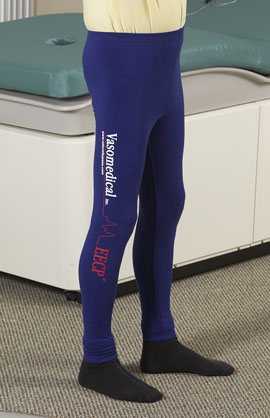
Treatment Pants
Patients are urged to wear tight fitting treatment pants (and pantyhose) as a protective layer between the treatment cuffs and skin to minimize skin irritation. Treatment pants should be sized for a smooth fit on the legs, not for abdominal girth. Waistband elastic can be cut if too tight. Excess fabric can wrinkle and cause skin irritation. Treatment pants are available in various sizes. Treatment pants should be worn tightly and be wrinkle free with the inseam stitching on the outside. Each patient is given a pair of treatment pants when treatment is begun. These pants may either be taken home to be laundered and maintained by the patient or kept at the treatment center.
For patients between pant sizes, use smaller sized pants thus minimizing excess fabric and the possibility of wrinkles and skin irritation.
Treatment Cuffs
Patients are wrapped from waist to ankles in specially designed inflatable cuffs which compress and decompress the lower extremities during EECP® Therapy. Upper thigh / buttock and lower thigh girth are used to approximate cuff sizing. Hook and loop bindings should overlap for secure wrapping. Abdominal extension straps are available to facilitate wrapping of patients with a large abdomen and small thighs. Cuffs are available in various sizes. Cuffs should be wrapped tightly. Internal wrinkles should be minimized.
For patients between cuff sizes, choose the larger sized cuffs. Larger cuffs compress greater body surface area increasing blood flow and providing more effective counterpulsation.
Note: Larger cuffs may occasionally extend to, or slightly below the knee. Apply the calf cuffs first, then secure the lower thigh cuff to overlap the calf cuff.
Cuff Sizing - There are six sizes of cuffs, from XX-Large to extra small. The size is chosen based on the patient's height and weight. For detailed information, refer to Unit 7-18 in The Therapist's Guide to Enhanced External Counterpulsation.
ECG Electrode Application Guide
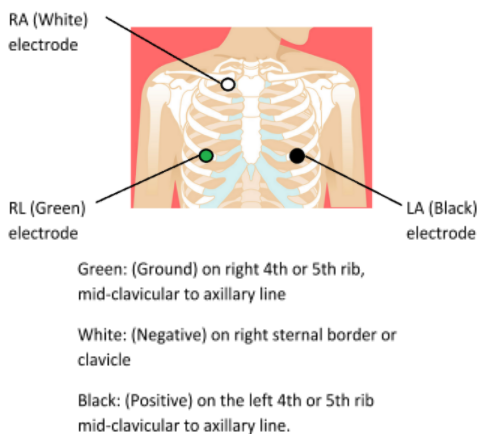
Step 1. Determine optimal positioning of electrodes
- Using the 12-lead ECG identify the lead which yields the highest positive R wave. Typical placement is seen in the diagram.
- NOTE: If a large positive competing “T” wave is observed; reversing polarity by exchanging the black and white electrodes may provide for better signal capture.
- All electrodes should be placed over bone.
- Apply the electrodes before applying the Cuffs.
Step 2. Prepare skin
- Prepare skin and apply an electrode to each chest site individually.
- Shave area if exessive hair is present.
- Cleanse skin with a small drop of Nuprep™ skin prepping gel on clean gauze pads.
NOTE: Use numerous strokes, light pressure and cover a large area with both the alcohol and the Nuprep™ - Remove excess gel
- Daily skin assessment and variation of electrode sites may be necessary to prevent skin irritation.
Step 3. Apply electrodes
- Remove electrodes from a freshly opened package, then reseal the package. Vasomedical ECG electrodes are recommended for EECP® therapy.
- Check the electrode expiration date on the package.
- Snap ECG wires to electrodes.
- The electrode sponge core should appear moist. If the electrode appears dry, apply a small drop of Signa Gel® ECG conductive gel to the sponge core of the electrode and work the gel into the sponge. Do not allow gel to spread to adhesive edge.
- Apply an electrode to each prepared chest site individually. Prepare the skin and place the first electrode adhesive side down onto the prepared skin location. Run your finger around the electrode several times starting at the outer edge and moving in toward the center. Then place gentle pressure at the center of the electrode to enhance gel absorption by the skin. Do the same with the second and third electrodes.
- Clip the ECG cable yoke to patient’s pillow.
- Thread lead wires down the side of the neck and beneath clothing. Leave some slack in the lead wires to prevent tension.